Adding Input
Every time a player joins, they will create our bootstrap, which we have instructed to make a Test Collision Body. Let’s connect this to some input, so a player could control the object. This is done in two parts: one, we need to make a file describing what keys we’re listening for; two, we will write script to test for those keys.
Sim .ini File
Sims usually have a connected ini file which is consumed by the viewer to help control things outside the simulation, itself, like input or camera. The ini file is connected by naming it the same as the sim file (without the .sim extension) and placing it next to the .sim file in your directory structure. Using your operating system or some sort of text editor, create a new text file named test_sim.ini located next to your sim. Your directory should contain these files now:
test_sim.ai
test_sim.ini
test_sim.sim
Editing test_sim.ini, add the following lines, connecting the left and right keys on the keyboard to input properties you will read, shortly:
Note: Other keys can be used, if desired (e.g. letter keys). See the full ini guide.
PrimaryAxisPositiveX,right
PrimaryAxisNegativeX,left
Now the view will tell any clients viewing this simulation to pass along these two properties with their input. Let’s create some input for our Test Collision Body to read.
Adding an Input Component
Back in simple, let’s add a new property to store an Input component. Right click on the PROPERTIES section of Test Collision Body and choose new PROPERTY > Input to make a new property.
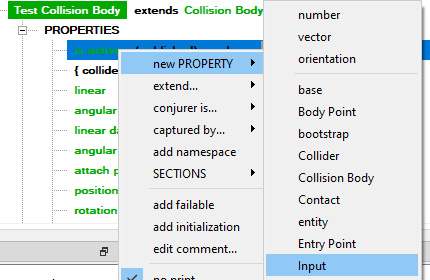
A name entry field will appear. Let’s name it input. You should see a new property added to the top of the list.
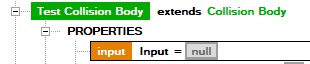
The orange box around the name of the property indicates it’s immediate. You’ll learn more about property types later, but because we are assigning input at runtime and want to remember it, we need to make it persistent. Right click on the property and select make persistent.
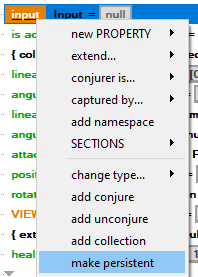
The property color should change to green, indicating it’s now persistent.

Now we just need to make sure it is assigned to the actual input coming in when a viewer joins.
Remember when we described bootstrap as a special component that the simulation Conjures for when a new viewer joins? Another component, of type Input is also conjured. You’ll learn more about Conjure and conjurer later, but, for now, let’s change the new property you added where you Conjure Test Collision Body to be that incoming Input.
In the Conjure operation within bootstrap, change the assignment of the input property you made to be conjurer > conjurer.
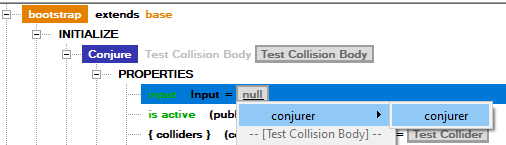
The assignment turns yellow, indicating your override, and shows ^^, representing ‘my conjurer’s conjurer’.

Script Logic
Checking Input
All that’s left is to read out the input component’s properties, which will be set when the player presses the keys you specified (e.g. left and right) in the ini file. We’ll add a little bit of script to the UPDATE of Test Collision Body which checks the input and causes the object to spin.
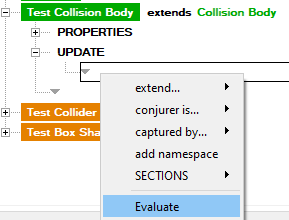
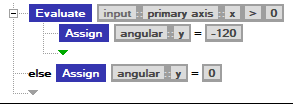
Right click on the Test Collision Body to add an UPDATE section. To it, we’ll want to add an Evaluate command, which lets us test an expression. Right click within the UPDATE section and select Evaluate.
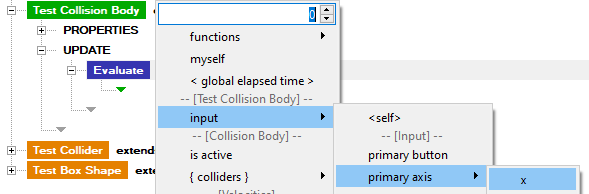
A new Evaluate operation will be added that says Evaluate 0. Left-click the gray area where the 0 is and pull down to select input > primary axis > x.
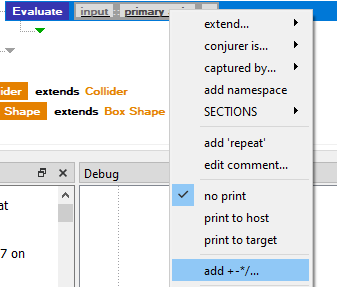
The line changes to represent your selection. Because that x can be positive or negative (corresponding to left or right keys, as we specified in the ini), we will want to check if it’s positive or negative. Right click over the gray area of the Evaluate line and select add +-*/...
This will add an additional element to the end, a + 0, which we can change. Let’s test if x > 0 by left clicking on the + section and pulling down to >.
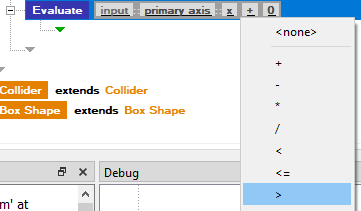
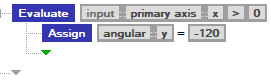
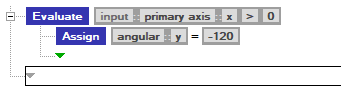
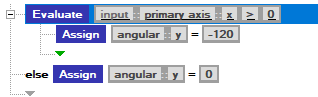
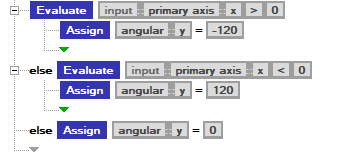
Our completed line should say Evaluate input :: primary axis :: x > 0.

The indented section created by our Evaluate means the script will only flow into there if the statement is true. When the player holds down the right key, the input’s primary axis x will be set to 1. This means that we can create something which only happens when the player is pressing a button.
Responding to Input
Let’s spin our Test Collision Body when the player presses the key. Right click in the indented area and add an Assign operation, which lets us change a property.
Note: If you mis-place a script operation, you can left click and drag it where you want to be

Left click on the gray box with the 0 of the Assign line and pull down to select the angular > y property.
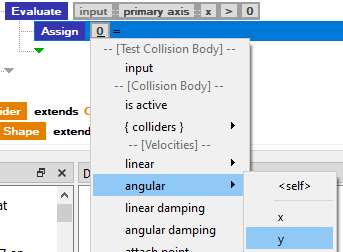
To spin the box to the right, we need to set a negative angular velocity. Left click on the gray box with the 0 to the right of the = sign and type in -120.
If you press the run button, you should see the box start spinning when you press the right key. It works! Let’s say we want the box to stop spinning when the player isn’t pressing the key, though. Let’s add a new Assign line below the Evaluate block, but since the Assign you already wrote is similar to what you’ll want, we can do it by copying and pasting.
Copy and Paste
Left click anywhere around the Assign line or on the blue box of the operation. You’ll see the line become highlighted with a blue backdrop.

Use Ctrl + C (or, from the menu, Edit > Copy) to copy this line, then, using the arrow keys or mouse, highlight the next line after the Evaluate block.
Use Ctrl + V (or Edit > Paste) to paste the line. Pasting always places the line above what you have highlighted.

If we were to run this right now, both Assign operations would happen. Even if the button were not pressed, the second Assign will always run, causing the box to always spin.
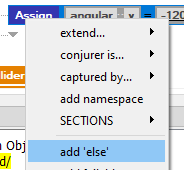
Else
We can use an else here, to indicate an operation should only occur if the indented flow above was not used. Right click on the bottom Assign and select add 'else'.
An else will appear to the left of the Assign. Left click on the -120 and change it to 0, meaning if the player is not pressing the right key, we set the angular velocity’s y to 0.
Try running and you should see the box turn when you press and stop when you release. How about the left key so we can spin the box the other way, using both of our player inputs? You might be able to figure out what to do using just what you’ve done so far, so give it a moment to think or experiment.
Did you give it a moment? Promise?
Ok, then you can proceed. We already have a block of script that looks like what we want, checking for the input’s axis x being greater than 0. We simply need another block that checks the opposite and sets the angular y to a positive number. Let’s copy and paste our entire Evaluate block. Select the Evaluate line.
Copy and paste it in place. Note you get a duplicate of not just the Evaluate line but the Assign contained within.
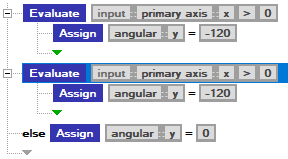
Let’s change the second Evaluate and Assign to handle our “pressing left” case. Reverse the > to be < 0 by clicking on the > and modifying the symbol, and change the Assign to be = 120 by selecting the -120 and changing the number.
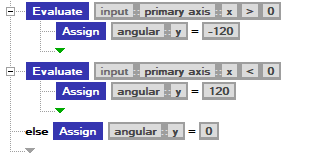
Since you added a new Evaluate at the top, the else won’t be working quite the way we want. Remember your else is associated only with the Evaluate directly above it. The result, if you were to run right now, is that you could press left and see the box spin, but pressing right would never work, since the second evaluate would always be false. You can chain else markup together, creating an execution where only one of many possible things can happen. Right click on the second Evaluate and add an else to it.
Once it looks like this, try running! You should be able to press right, left, or neither and see the box respond.